Advantages and disadvantages of ultrasonic waves in detecting industrial defects
Ultrasonic waves
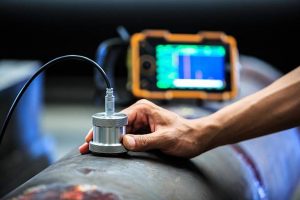
The ultrasonic waves are used to detect the presence of flaws in the form of cracks, blowholes, porosity in metallic pipes as those used in conveying the natural gas or parts of nuclear reactors.
The cracks, holes, air bubbles and welding defects can be detected by passing ultrasonic waves through the material to be examined, and measuring the time interval of the reflected beam, so, flaws in the metal block can be determined.
The defects in manufactures can be detected through the variation in the intensity (amplitude of vibration ) of the reflected waves.
The ultrasonic waves can be used in detecting the industrial defects as the waves reflected from the areas which contain air bubbles (the defects in welding) have a different intensity than those reflected from well-welded areas.
Ultrasonic Testing (UT) uses high-frequency ultrasonic waves to detect the surface breaking and internal imperfections, It measures the material thickness and it determines acceptance or rejection of a test object based on a reference code or standard.
The sound waves travel through a given medium at a specific speed or velocity, and in a predictable direction, When they encounter a boundary with a different medium, they will be reflected or transmitted according to simple rules, This is the principle of physics that underlies ultrasonic flaw detection.
The velocity of the sound wave varies depending on the medium through which it is traveling, It is affected by the medium’s density and elastic properties, And different types of sound waves will travel at different velocities.
When an ultrasonic wave is passed from one medium to another, some energy is reflected and the remaining energy is transmitted, so, it is very important to understand how effectively ultrasonic waves pass from one medium to another.
Advantages of ultrasonic waves in detecting industrial defects
Ultrasonic testing has high sensitivity, high penetrating power that allows the detection of flaws deep in the part, it permits the detection of extremely small flaws.
It has greater accuracy than other nondestructive methods in determining the depth of internal flaws and the thickness of parts with parallel surfaces.
Ultrasonic testing can estimate the size, the orientation, the shape and the nature of defects, it is not dangerous on the operations or on the nearby personnel and it has no effect on the equipment and the materials in the vicinity.
Disadvantages of ultrasonic waves in detecting industrial defects
Ultrasonic testing is a manual operation that requires careful attention by experienced technicians.
Extensive technical knowledge is required for the development of inspection procedures, and the parts that are rough, irregular in shape, very small or thin, or not homogeneous are difficult to inspect.
Inspected items must be water-resistant when using water-based couplants that do not contain rust inhibitors, and couplants are needed to provide effective transfer of ultrasonic wave energy between the transducers and parts being inspected unless a non-contact technique is used.
The echo (the sound reflection) and conditions necessary for hearing the echo
The importance of ultrasonic waves in medical diagnosis
The effect of echo in locating the position of surfaces and barriers
The concentration of sound and importance of echo (sound reflection) in our life


It’s great that you mentioned that ultrasonic testing has higher accuracy in determining the depth, size, orientation, and shape of the flaw or defect. My boyfriend would be interested in this fact since he has always been fascinated by non-destructive methods as a frustrated engineer. I’ll bookmark this article and share it with him when he gets home from work later. Thanks!
You are welcome